Ideal Ways to Download Mailbox From Office 365

Looking for a convenient method to download mailbox from Office 365 lately? Then, this is the article for you. Carry on reading the blog till the end to find 2 different ways.
With time, organizations are rapidly shifting to Office 365 to work in a collaborative environment. And, there is no denying that businesses produce more and more data every single day.
Since data is the key element of any business and is mostly exchanged in form of emails, have you seriously thought about its security? Is it really safe in the cloud storage of Office 365?
Think about it, what if a ransomware attack happens to your organization? Also, there is a great chance of accidental deletion of important emails. So, to prevent such unfortunate scenarios, it’s best to archive Outlook 365 emails to hard drive.
While many are under a false perception that backing up data isn’t necessary. However, experts suggest having a copy of important emails handy with you.
So, you can refer to the different methods to safely save your emails to your system.
How to Save Office 365 Emails to Desktop? The Distinct Ways
Microsoft is a well-established tech giant. However, the truth is, it doesn’t take full responsibility for the data.
But, somehow, it provides a native method to export emails using the eDiscovery utility(if you own an admin account).
Alternatively, you can use the Import/Export Wizard to manually download your emails.
Moreover, both the above methods require high technical skills to pull off the downloading process.
Luckily, the good news is that whether you have a user account or an admin account, you can easily download mailbox from Office 365.
How?
Simple! Just take backup through the Secured Office 365 Backup Tool.
As a matter of fact, the content search eDiscovery utility is a really complex way of downloading emails. So, here we’ll only discuss the 2nd native method and the automated method using the tool.
Let’s first take a look at the automated method.
Easily Download Mailbox from Office 365 using the Trusted Software
You will be amazed to know that many industry experts are recommending this software to backup your emails.
Why So?
Well, it’s due to its remarkable features. Like, you don’t have to worry about any data loss during the process. Also, for some reason, if you lost the internet connectivity then the software will resume the process when it’s back.
And, on top of that, you will find the same folder hierarchy as the source, in the resultant backup folder.
So, let’s understand how to save Office 365 emails to desktop through the given steps.
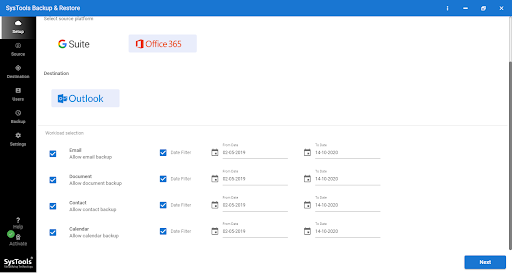
Step-1: Download the software and launch it on your system. After that, navigate to the ‘Set up’ section and select source as ‘Office 365’ and destination as ‘Outlook’.

Step-2: After setting up source and destination, tick the categories such as ‘Email’, ‘Document’, ‘Contact’ under the ‘Workload selection’

Step-3: There is an option for you to choose a selective backup using the ‘Date Filter’. Just click on the same and select the date range.

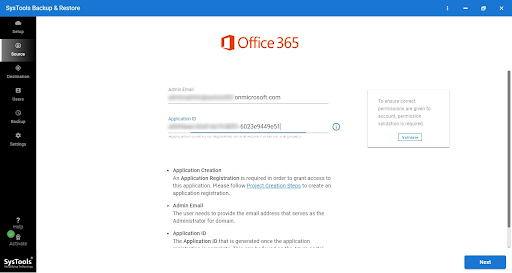
Step-4: Now, move on to the ‘Source’ tab. And, provide the ‘Admin Email’ and ‘Application ID’ correctly to archive Outlook 365 emails to hard drive.

Step-5: By clicking on ‘Validate’, verify user permission for Source and hit ‘Next’

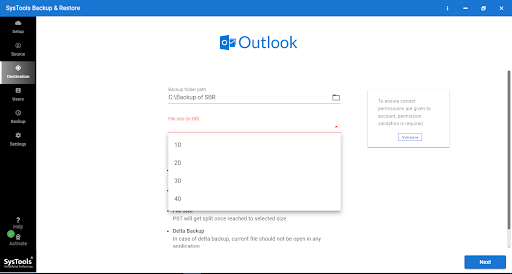
Step-6: Next, move on to the ‘Destination’ tab. And, select the ‘Backup folder path’ where you want to save the downloaded result then, choose the ‘file size’

Step-7: After that, by clicking on the ‘Validate button’, verify the permissions for Destination and hit ‘Next’

Step-8: Click on the ‘fetch users’ and choose the source emails to download from Office 365.

Step-9: Lastly, validate and hit the ‘Start Backup’ to get started with the backup process.
Now you know how to easily save Office 365 emails to desktop. Next, let’s have a look at the manual approach.
Manually Save Your O365 Emails Using Import/Export Wizard
In Microsoft Office 365, you can use the Import/Export wizard to download the emails in pst format.
However, it is not ideal for a non-technical person, as the Office 365 account needs to be properly configured before starting the process.
If you are absolutely certain about attempting this process then only opt for it. Otherwise, if you don’t want to take any chances then you have the automated method.
Let’s discuss the steps to download mailbox from Office 365.
Step-1: Open Outlook and click on the ‘File’ that is present at the top left of your screen.
Step-2: After that, look for the ‘Open & Export’ and press the ‘Import/Export’
Step-3: Select the ‘Export to File’ option and click ‘Next’
Step-4: Now, select the ‘Outlook Data file(.pst)’ and hit ‘Next’
Step-5: Next, select the mailbox that you want to take backup
Step-6: Don’t forget to click on the ‘Include sub folders’ checkbox to save the entire mailbox. Or, you can just select the folders you want to save from the list.
Then click ‘Next’
Step-7: To choose the destination location of the Outlook (.pst) file, click on the ‘Browse’. And, under the ‘Option’ section, select the radio button as per your choice.
Step-8: Lastly, press the ‘Finish’ button.
[Optional: Protect your PST files with passwords. To do so, enter the same or just leave it blank and press ‘OK’]
That’s how you can save Office 365 emails to desktop.
But, the above method will take a lot of time if you have a huge number of emails to download. And, not to mention, configuring the account itself is a very time-consuming process.
Conclusion
In this fast-growing digital world, any data loss incident can happen at any time. So, you need to be cautious and think seriously to protect your data by downloading your crucial emails through a trusted backup tool.
After going through the above article, you must have found the best way to download mailboxes from Office 365. Hence, save your emails to your system before it’s too late!
Also Read: How to Combine vCard Files into One – Complete Guide


